DOWNLOAD AND INSTALL JBoss 5.0 AS
First of all, we need to download JBoss 5.0 AS. I can download from http://sourceforge.net/project/downloading.php?group_id=22866&filename=jboss-5.0.0.GA.zip
 JBoss AS is independent OS platform.
Assumption, my download file is in /Desktop folder.
Open the X terminal
First, I have to check the disk space in /opt to make sure that it still have enough space for installation. (I will put the JBoss folder inside /opt folder), using this command:
# bash
bash-3.00# df -h /opt
Filesystem size used avail capacity Mounted on
/dev/dsk/c0d0s0 7.7G 3.7G 3.9G 49% /
Now, I will unzip the JBoss file to /opt folder:
bash-3.00# unzip /Desktop/jboss-5.0.0.GA.zip -d /opt/
I just wait until the unzip process is finished.
Basically JBoss installation is just to unzip the file to the destination folder.
Then the JBoss folder (jboss-5.0.0.GA) should be exist in the /opt folder. To verify the folder I type this command:
bash-3.00# ls -la /opt/
total 12
drwxr-xr-x 6 root sys 512 Apr 20 21:12 .
drwxr-xr-x 41 root root 1024 Apr 20 20:16 ..
drwxr-xr-x 3 root bin 512 Apr 12 13:20 SUNWits
drwxr-xr-x 4 root bin 512 Apr 12 13:35 SUNWmlib
drwxr-xr-x 8 root root 512 Dec 4 21:28 jboss-5.0.0.GA
drwxr-xr-x 8 root root 512 Apr 12 13:45 staroffice8
bash-3.00#
START AND STOP JBoss 5.0 AS
Start (run) the JBoss AS:
bash-3.00# cd /opt/jboss-5.0.0.GA/bin/
bash-3.00# ./run.sh -b 0.0.0.0
I just wait the process until the server is running.
To verify the server is running, notice in the console: ...Started in 1m:56s:165ms
By default JBoss will use port 8080. If your port is conflict with other web server, you can change the JBoss port number to something else.
Now, I open the browser then type in:
http://localhost:8080
or using IP address http://192.168.56.132:8080
 | If the JBoss AS is running, the browser should look like this picture |
Stop (shutdown) the JBoss AS:
bash-3.00# cd /opt/jboss-5.0.0.GA/bin/
bash-3.00# ./shutdown.sh -S
Shutdown message has been posted to the server.
Server shutdown may take a while - check logfiles for completion
DEPLOY AND UNDEPLOY J2EE WEB APPLICATION in JBoss 5.0 AS
In this section, I will deploy example Struts 2 web application in JBoss AS.
We can download the example application from http://struts.apache.org/download.cgi.
 | Choose: Struts 2.1.6 > Example Applications > struts-2.1.6-apps.zip |
Suppose we download the file in the /Desktop folder.
First of all, we need to unzip the file. In here I will unzip in the /export/home folder:
bash-3.00# unzip /Desktop/struts-2.1.6-apps.zip -d /export/home/
After the unzip is finished, struts-2.1.6 folder should exist inside /export/home folder.
To verify it use this command:
bash-3.00# ls -la /export/home/
total 15256
drwxr-xr-x 5 root root 512 Apr 21 12:13 .
drwxr-xr-x 3 root sys 512 Apr 12 13:11 ..
drwx------ 2 root root 8192 Apr 12 13:11 lost+found
drwxr-xr-x 3 root root 512 Jan 5 21:29 struts-2.1.6
-r--r--r-- 1 root root 7783312 Apr 12 22:31 vmware-solaris-tools.tar.gz
drwxr-xr-x 7 root root 512 Mar 27 11:47 vmware-tools-distrib
To deploy the web application, we just copy the struts2-blank-2.1.6.war file to the /opt/jboss-5.0.0.GA/server/default/deploy folder:
bash-3.00# cd /export/home/struts-2.1.6/apps/
bash-3.00# cp struts2-blank-2.1.6.war /opt/jboss-5.0.0.GA/server/default/deploy
bash-3.00#
To verify that the file is copied successfully, use this command:
bash-3.00# cd /opt/jboss-5.0.0.GA/server/default/deploy
bash-3.00# ls -la | grep war
drwxr-xr-x 6 root root 512 Dec 4 17:23 ROOT.war
drwxr-xr-x 6 root root 512 Dec 4 17:23 jmx-console.war
-rw-r--r-- 1 root root 4157406 Apr 21 12:30 struts2-blank-2.1.6.war
Now we start the application server:
bash-3.00# /opt/jboss-5.0.0.GA/bin/run.sh -b 0.0.0.0
This command is very straightforward, but you can use other command which mentioned in previous section.
During the JBoss AS is running, it will automatically deploy the war file.
Notice this message in the JBoss console:
13:40:37,159 INFO [TomcatDeployment] deploy, ctxPath=/struts2-blank-2.1.6, vfsUrl=struts2-blank-2.1.6.war
After the server is running, now we can ready to use the our sample Struts web application.
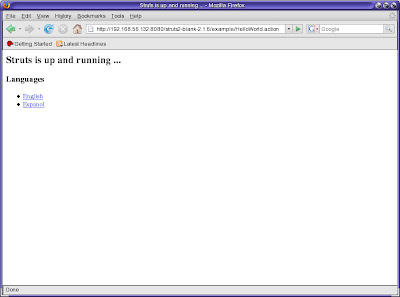
Now open the browser and type in http://192.168.56.132:8080/struts2-blank-2.1.6. We should see the Struts application as in this picture:
To undeploy the web application is even more simple than deploy. What we need to do is just delete the war file. It can be done during the server is running or server is offline. Suppose here, the JBoss AS is running.
To undeploy the web application:
bash-3.00# cd /opt/jboss-5.0.0.GA/server/default/deploy
bash-3.00# rm -rf struts2-blank-2.1.6.war
bash-3.00#
After deletion, in the JBoss console will automatically undeploy this web application.
Notice this message in the console:
13:42:57,274 INFO [TomcatDeployment] undeploy, ctxPath=/struts2-blank-2.1.6, vfsUrl=struts2-blank-2.1.6.war
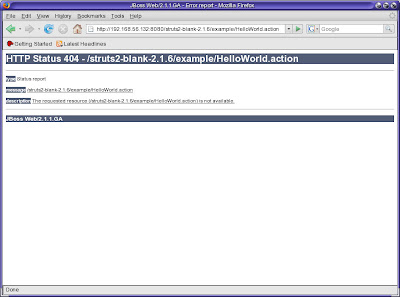
Now, if we browse again the application, browser couldn't find our Struts application anymore. See the picture:
YUP, IT'S DONE...!!
It is the end of our experiment. Please let me know if you have any other experience on this.


